◉ For LM Series Laminator
while the laminator being improper used, the laminating film will be melt in the high temperature, it will make the rollers covered with glue, become uneven after cooling, then will be difficult to clean up; when the rollers reaches the end of the service life, the silicone will crack and blistering. when these situations occur, it will be no longer for laminating, the rollers must be replaced.
It must to adjust the roller pressure after installation, to make it same of the both sides. For the method, please refer to the article [How to adjust the roller pressure of Rayson LM series laminator]
Supply
Phillips screwdriver
Tools
Phillips screwdriver

Method
1. Use the Phillips screwdriver to unscrew and take off the top cover.

2. Same to take off the front cover.

3. And take off the back side cover.

4. Take off the right side cover.

5. Take off the left side cover.

6. Take off the reflector.

7. Take off the left side and right side spring.

8. Take off the left side and right side shaft sleeve bushing plate.

9. Take off the top rollers.

10. Take off the thermistor.

11. Take off the middle plate.

12. Take off the under rollers.

13. Install the new rollers, please noted, the direction of the sleeve, the under sleeve R mark is upward, the top rollers “R” mark is upside down like.

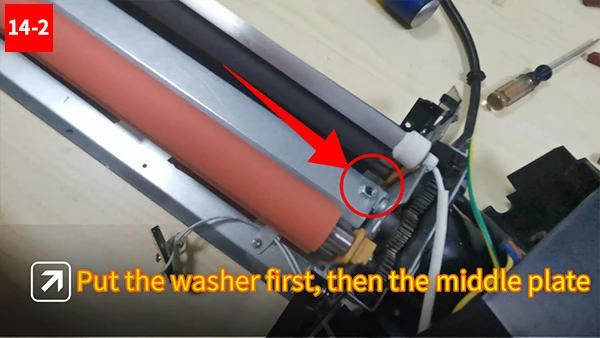
14. Install the middle plate (please noted that the both right & left side must be put a washer above screw hole), put the washer first, then fix the middle plate.

15. Install the shaft sleeve bushing plate, shaft sleeve bushing plate is pressed on shaft sleeve, between bracket and shaft sleeve eaves.

16. Install the spring.

17. Install the reflector.

18. Install the thermistor, the thermistor must be pressed tightly on the rollers.

19. Install the left cover.

20. Install the right side cover.

21. Install the front cover.

22. Install the back side cover (please noted that the back side cover with exit pressure plate, the upward bending part of exit pressure plate is facing to rollers).

23. Install the top cover, repairing done.

Originally published 22 Aug 2020, updated 22 Aug 2020.


Company: Rayson Electrical Mfg Ltd
Address: TangCun industial Estate, Nanhai Foshan, GuangDong, China, 528241
Phone: 0086 157 1191 1932
Fax: 0086 020 3121 2770
E-mail: sky@raysonstapler.com


Copyright © 2003-2026 Rayson Electrical Mfg Ltd | Sitemap