Date: 01 Jul 2020 | Tag: heavy duty stapler
Heavy duty stapler is a complex set of machines, and usually come in a box with instructions regarding their use. Many times, the installation instructions could be a little indirect, making heavy duty stapler hard to assemble even after purchasing. Rayson is one of the lead manufacturers of heavy duty stapling equipment in the world today.
The assembly of heavy duty stapler is majorly dependent on the maker of the staplers, but we will try to be as generic as possible with the assembly instructions.
The following are the steps to follow for the assembly of heavy duty stapler:
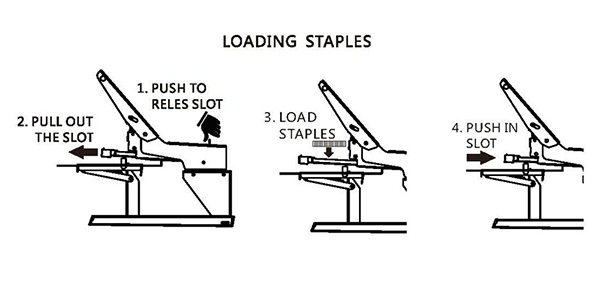
Push, then lift the Staple Mechanism
The stapling mechanism is usually a long flat bar that has a handle at the back end of the heavy duty stapler. The stapling mechanism will help the user of the heavy duty stapler access the staple compartment area of the stapler. Pushing the stapling mechanism will release its spring loading, and pulling it up will help lift the mechanism, thereby allowing the user access into the staple compartment of the stapler.
Insert Staples into the Staple Compartment
A pen is useless without its ink, just in the same way, the assembly of a heavy duty stapler would not be complete until the staples have found their way into their right apartment in the equipment. Once the stapling mechanism has been lifted, the staple compartment becomes visible, thereby allowing you the opportunity to put as many staples as the heavy duty stapler can take. Insert as many staples as much as the machine can take at this stage.
Fix back the Staple Mechanism
Once you have successfully loaded your heavy duty stapler with staples, you then need to fix back the stapling mechanism as it is the one that allows the heavy duty stapler to engage stapling activities seamlessly.

Originally published 01 Jul 2020, updated 01 Jul 2020.